This guide will show you how to cross-compile Qt 5.12 for Raspberry Pi on your computer and install it on a Raspberry. Thus, thanks to Qt Creator, you can design and build Raspberry Pi apps on your computer and compile, deploy, run and debug them directly on the Raspberry Pi.
- Why setup cross-compile ?
- Things we will need to setup Qt and Raspberry Pi Cross-Compiling
- Lets get started on the Raspberry Pi
- Installing the development libraries on the Raspberry Pi
- Prepare the target folder on the Raspberry Pi
- Now install some Qt libraries we will need later including MariaDB
- Lets move over to the development Linux PC
- Create working folder and setup the toolchain
- Next, Create and configure a sysroot
- Download Qt source
- Configure Qt for cross compilation
- Compile, install and deploy Qt on the development PC
- Setup Qt Creator for Raspberry Pi cross compilation on the PC
- Setting up SSH Keys for Qt in Qt 5.14.1+
- Conclusion
- Share your toughs, was compiling and deploying the Qt tool-chain easy for you ?
Why setup cross-compile ?
Cross Compiling will benefit work flow and development speed overall, it will enable you to design and code applications on your PC and then compile and run and debug them directly on the Raspberry Pi.
To setup a workable Qt C++ cross-compile environment with something like an IoT device such as a Raspberry Pi has always been very confusing and frustrating. This guide will help shed some light and clarity on how to go about setting up a workable Qt cross-compile environment using Linux and RaspOS.
Qt 5.12 is the LTS (Long Term Support) version of the popular Qt framework. For those unfamiliar with Qt, Qt is a rich framework which uses C++ with many ready-to-use multi-platform components in various areas such as multimedia, networking, connectivity, and graphics.
Qt Creator is a powerful multi-platform integrated development environment (IDE) for building and deploying Qt apps, available for Linux, macOS, and Windows.
Things we will need to setup Qt and Raspberry Pi Cross-Compiling
This step-by-step guide is for Raspberry Pi 3 Model B and Qt 5.12 Branch, but these steps should be similar for newer Qt releases and other Raspberry Pi board versions.
We will be using Linux Mint for out Desktop operating system.
But this guide should work with most major Linux distributions: Ubuntu, Debian, etc.
Raspberry Pi OS is Raspbian Buster and works with any version (Raspbian Stretch are also supported). Again, the tutorial steps should be fairly similar for other configurations.
You will also need a Raspberry Pi Model B+ or better.
A SD class 10 SD card with Raspbian (RaspOS) operating system installed and ready to go.
And both your Computer and the Raspberry Pi connected to the same network.
Note: This tutorial works for Qt 5.12 and 5.12.2 to 5.12.5 (but not for 5.12.1 due to some bugs). For Qt 5.12.2 to 5.12.5, you need to set the -device argument in your build config file to linux-rasp-pi-g++ instead of linux-rasp-pi3-g++.
Lets get started on the Raspberry Pi
Lets check and make sure that the latest firmware in in use on the Raspberry Pi or install it and reboot the system. Execute the following command in the Raspberry Pi command-line interface (Terminal) for updating the firmware.
sudo rpi-update
reboot
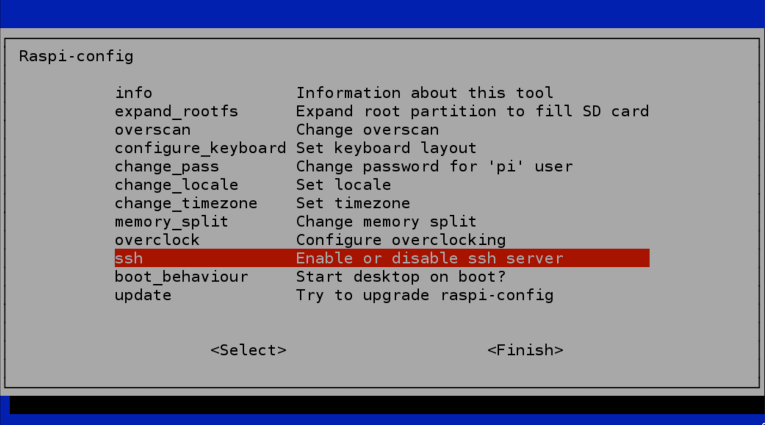
Next make sure that you have activated the Secure Shell (SSH) protocol in Raspbian (RaspOS). We will need it later to link and communicate between Qt Creator on your PC and the Raspberry Pi.
sudo raspi-configSelect Interfacing Options, select ssh, choose yes and finish. See Below
Installing the development libraries on the Raspberry Pi
We need to install some development libraries, so the first thing to do is to allow the system to install source packages, for this you only have to uncomment the deb-src line in the /etc/apt/sources.list file, which configures the system repositories. Use your favorite text editor for this, we are using nano in this example.
sudo nano /etc/apt/sources.listThen uncomment by remove “#” in front of the deb and deb-src. Save the file and exit.
The next step is to update and install the required development packages.
sudo apt-get update
sudo apt-get build-dep qt4-x11
sudo apt-get build-dep libqt5gui5
sudo apt-get install libudev-dev libinput-dev libts-dev libxcb-xinerama0-dev libxcb-xinerama0
Prepare the target folder on the Raspberry Pi
Create a folder on the Raspberry Pi for the pi user. This folder (/usr/local/qt5pi) will be used to deploy Qt from our computer to the Raspberry Pi.
sudo mkdir /usr/local/qt5pi
sudo chown pi:pi /usr/local/qt5pi
Now install some Qt libraries we will need later including MariaDB
On the raspberry Pi run the following command to install the libraries
sudo apt install mariadb-client mariadb-common mysql-common libmariadb-dev-compat libmariadbclient-dev libqt5sql5-mysql libqt5sql5 libqt5sql5-sqlite
The libmariadb-dev-compat package will create all the links necessary for compatibility between mariadb and mysql. Then, when you call to qt configure script you must indicate the path of the mysql (mariadb) libraries.
Exit the Raspberry Pi SSH session.
Lets move over to the development Linux PC
For now we are done on the raspberry Pi, its time to move over to the PC you will be using to develop on. A few things need to happen here to make the cross compile environment work between the Raspberry Pi and Qt.
Create working folder and setup the toolchain
On your Linux development PC, create a folder in home folder and download the toolchain. For this guide we will be creating a folder called raspi in the home directorty
mkdir ~/raspi
cd ~/raspi
git clone https://github.com/raspberrypi/tools
Next, Create and configure a sysroot
A sysroot is a directory structure that includes all the folders needed to run a particular system. We are creating a new sysroot for Raspberry Pi cross compilation on our development computer. Not on the Pi
mkdir sysroot sysroot/usr sysroot/optThis is done inside of the raspi folder
We can use rsync to synchronize our computer’s sysroot and the Raspberry Pi. So, if we make changes in our computer’s sysroot, they can be easily be transferred to our Raspberry Pi,
Note: raspberrypi_ip is the IP address of your Raspberry Pi on the local network, it’s easier to just use the IP address here.
rsync -avz pi@raspberrypi_ip:/lib sysroot
rsync -avz pi@raspberrypi_ip:/usr/include sysroot/usr
rsync -avz pi@raspberrypi_ip:/usr/lib sysroot/usr
rsync -avz pi@raspberrypi_ip:/opt/vc sysroot/opt
Next, we need to adjust our symbolic links in sysroot to be relative since this folder structure is on both our development computer and the Raspberry Pi.
wget https://raw.githubusercontent.com/riscv/riscv-poky/master/scripts/sysroot-relativelinks.py

chmod +x sysroot-relativelinks.py
./sysroot-relativelinks.py sysroot
Download Qt source
Download and untar Qt 5.12.5 or any other version you want to use.
wget http://download.qt.io/official_releases/qt/5.12/5.12.5/single/ qt-everywhere-src-5.12.5.tar.xz

tar xvf  qt-everywhere-src-5.12.5.tar.xz
cd  qt-everywhere-src-5.12.5
Configure Qt for cross compilation
Note: In the new Raspbian versions, EGL libraries have different names than those assumed in Qt configuration files, edit the ./qtbase/mkspecs/devices/linux-rasp-pi-g++/qmake.conf file and substitute all references to -lEGL and -LGLESv2 for -lbrcmEGL and -lbrcmGLESv2, respectively if needed.
The linux-rasp-pi3-g++ (Qt 5.12) or linux-rasp-pi-g++ (Qt 5.12.2 to Qt 5.12.5) folder applies to Raspberry Pi 3 version, if you have a different Raspberry Pi version check the list of compatible devices which can be found in ./qtbase/mkspecs/devices and in the table below (summarized from the table in the tutorial to build Qt 5.12 for Raspbian directly on Raspberry Pi).
| Version | Configure option | Architecture | Remarks |
| Raspberry Pi 3 (not working for Qt 5.12.2 to 5.12.5) | -device linux-rpi3-g++ | ARM V8 | QtScript build fails -skip qtscript needed |
| Raspberry Pi 2 | -device linux-rpi2-g++ | ARM V7 | |
| Raspberry Pi 1 Raspberry Pi Zero | -device linux-rpi-g++ | ARM V6 |
The following command configure the open-source Qt version for cross compilation. Again, the particular device is set by the -device argument in this case linux-rasp-pi-g++, set the appropriate value for your board version. You can omit the compilation of problematic or time consuming modules using the -skip argument. In this case, we have omitted the compilation of the qtwayland, qtlocation and qtscript modules.
Remember: For Qt 5.12.2 to 5.12.5, the build configuration file must be set to linux-rasp-pi-g++ instead of linux-rasp-pi3-g++ in the -device argument.
Here is my exact configuration script for Qt 5.12.5 to compile it from source with MySQL(MariaDB) Driver.
./configure -release -opengl es2 -device linux-rasp-pi-g++ -device-option CROSS_COMPILE=~/raspi/tools/arm-bcm2708/gcc-linaro-arm-linux-gnueabihf-raspbian-x64/bin/arm-linux-gnueabihf- -sysroot ~/raspi/sysroot -opensource -confirm-license -skip qtwayland -skip qtlocation -skip qtscript -make libs -prefix /usr/local/qt5pi -extprefix ~/raspi/qt5pi -hostprefix ~/raspi/qt5 -no-use-gold-linker -v -no-gbm -sql-mysql MYSQL_INCDIR=~/raspi/sysroot/usr/include/mysql MYSQL_LIBDIR=~/raspi/sysroot/usr/lib/arm-linux-gnueabihfFor a successful configuration, verify that the build options includes EGFLS for Raspberry Pi, it should look something like this
Build options:
......
QPA backends:
  ......
  EGLFS .................................. yes
  EGLFS details:
    ......
    EGLFS Raspberry Pi ................... yes
    ......
Also make sure that the database for MariaDB (MySQL) is detected.
Qt Sql Drivers:
 DB2 (IBM) .............................. no
 InterBase .............................. no
 MySql .................................. yes
 OCI (Oracle) ........................... no
 ODBC ................................... no
 PostgreSQL ............................. yes
 SQLite2 ................................ no
 SQLite ................................. yes
Compile, install and deploy Qt on the development PC
The exact compilation time depends on your computer performance. This process can take up to 2 or 3 or more hours in nowadays common computers. Compiler processes can be executed in parallel by means of the j flag. For four make processes, execute: make -j 4 assuming you have a CPU with 4+ cores
make
make install
Once Qt is compiled, it can be deployed to your Raspberry Pi using the rsync command. This step in important to get the cross compile environment working.
rsync -avz qt5pi pi@raspberrypi_ip:/usr/localNote: You may face some errors during the compilation the Qt 5.12 process due to some bugs. They have been already patched in Qt 5.12.1, but this tutorial currently doesn’t work for that version. You may prefer to compile the newest Qt 5.12.2 to Qt 5.12.5 versions to avoid these bugs.
Setup Qt Creator for Raspberry Pi cross compilation on the PC
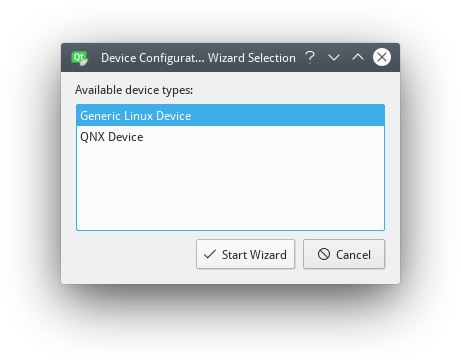
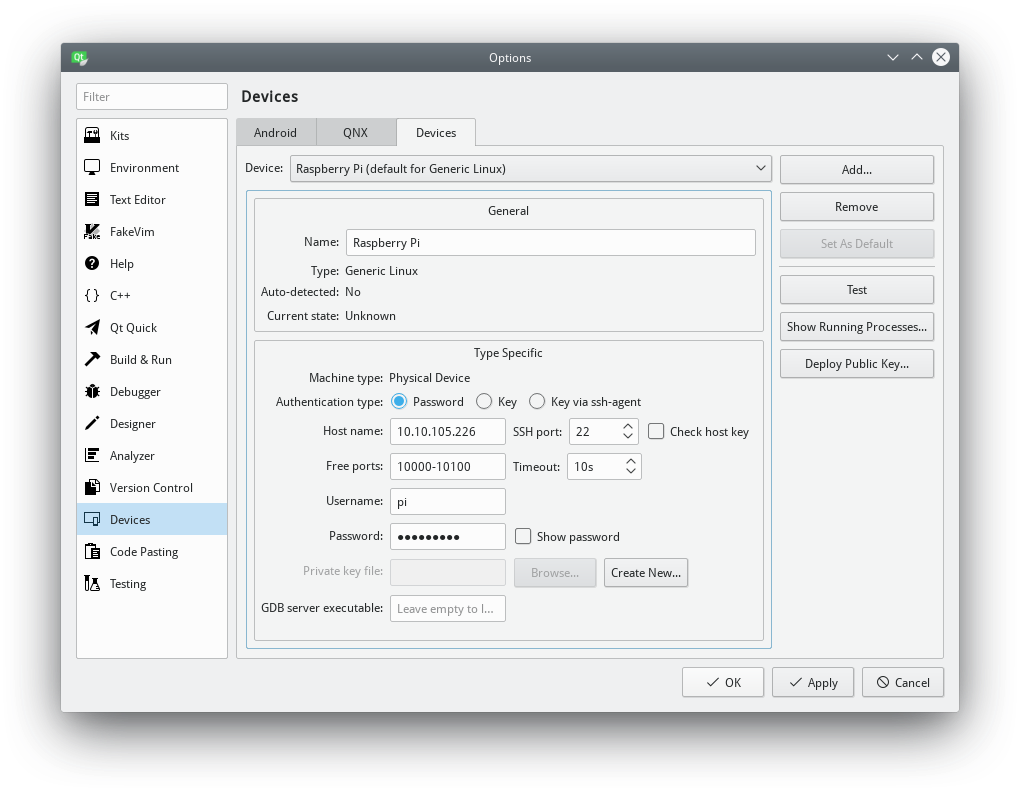
First, open Qt Creator, go to the Tools -> Options menu, select the Devices section and Devices tab. Add a new Generic Linux Device as indicated below.
Set a name for the configuration (Raspberry Pi), the network name or IP, the username (pi) and password (by default raspberry).
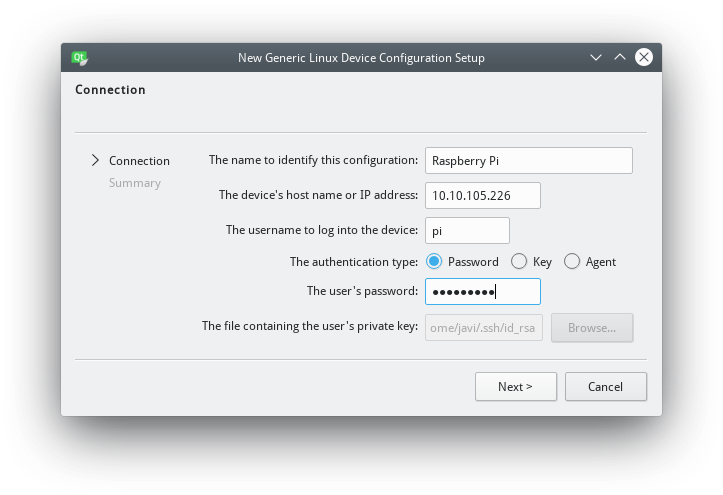
Before you finish the wizard, the connection to your Raspberry Pi will be verified and you will have then a new device configured in Qt Creator.
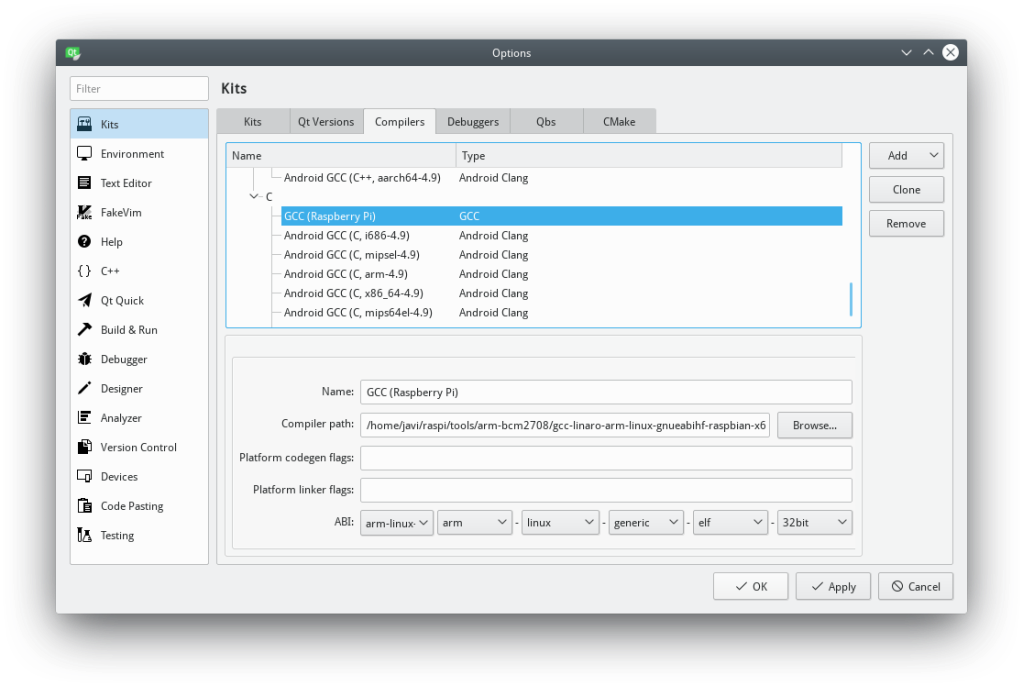
Next, go to the Kits section and Compilers tab, Add GCC C and C++ cross compilers for Raspberry Pi.
The path for the GCC C Raspberry Pi compiler is ~/raspi/tools/arm-bcm2708/gcc-linaro-arm-linux-gnueabihf-raspbian-x64/arm-linux-gnueabihf/bin/gcc.
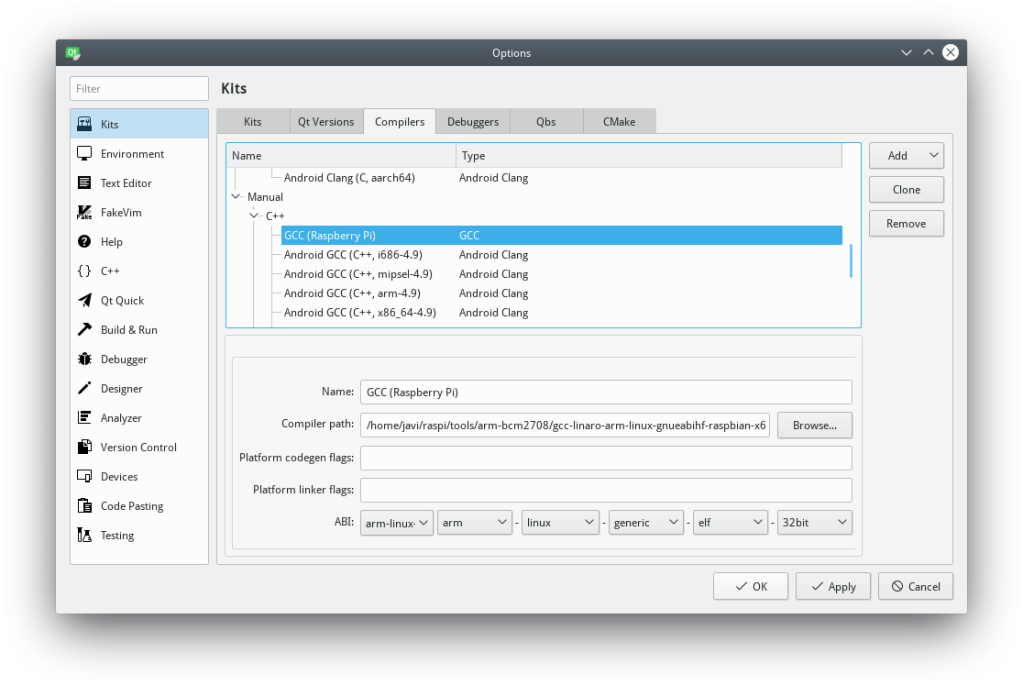
The path for the GCC C++ Raspberry Pi compiler is the same as for the GCC C compiler.
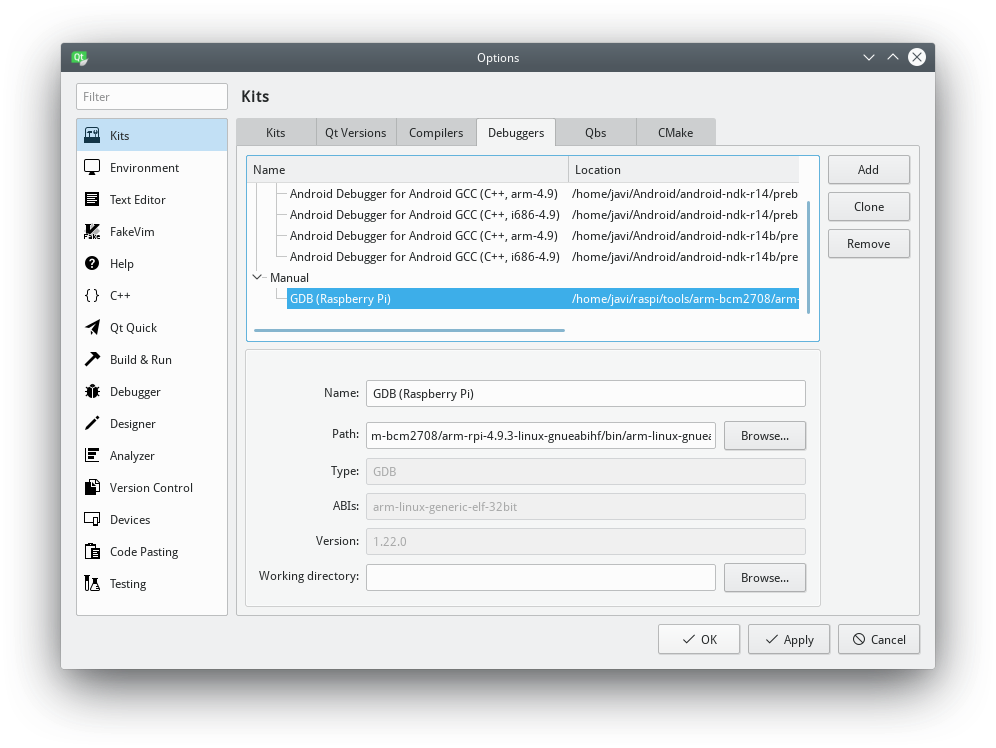
Next, go to the Debuggers tab, and Add a debugger, set its path to ~/raspi/tools/arm-bcm2708/arm-rpi-4.9.3-linux-gnueabihf/bin/arm-linux-gnueabihf-gdb.
Go to the Qt Versions tab and Add a new version: Qt 5.12 (Raspberry Pi), set the qmake path to ~/raspi/qt5/bin/qmake.
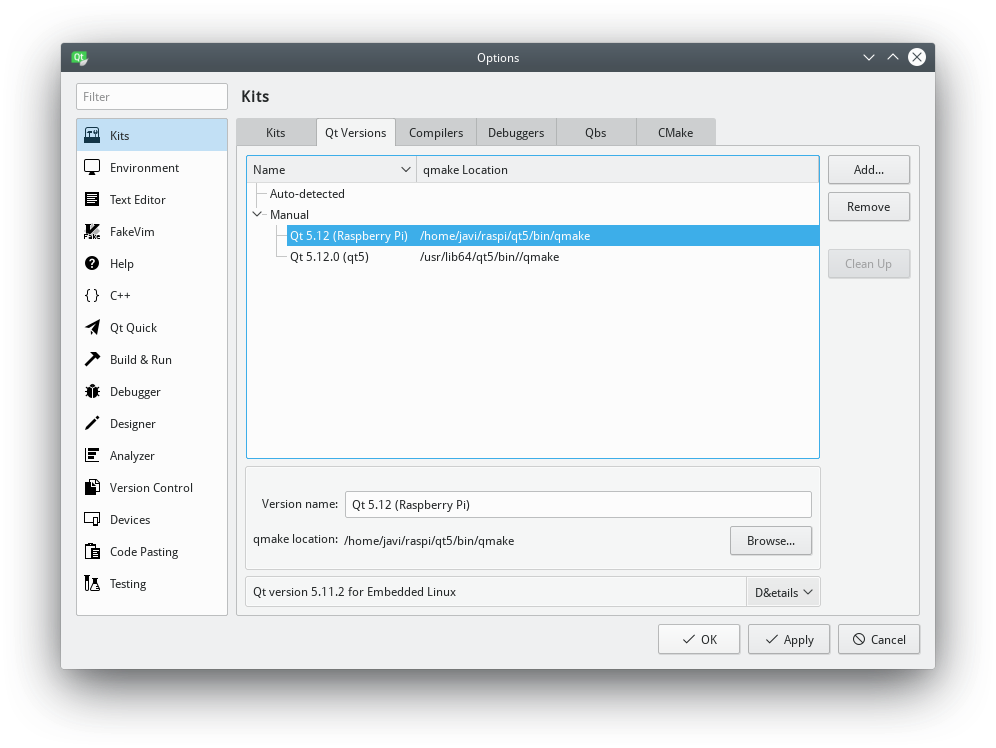
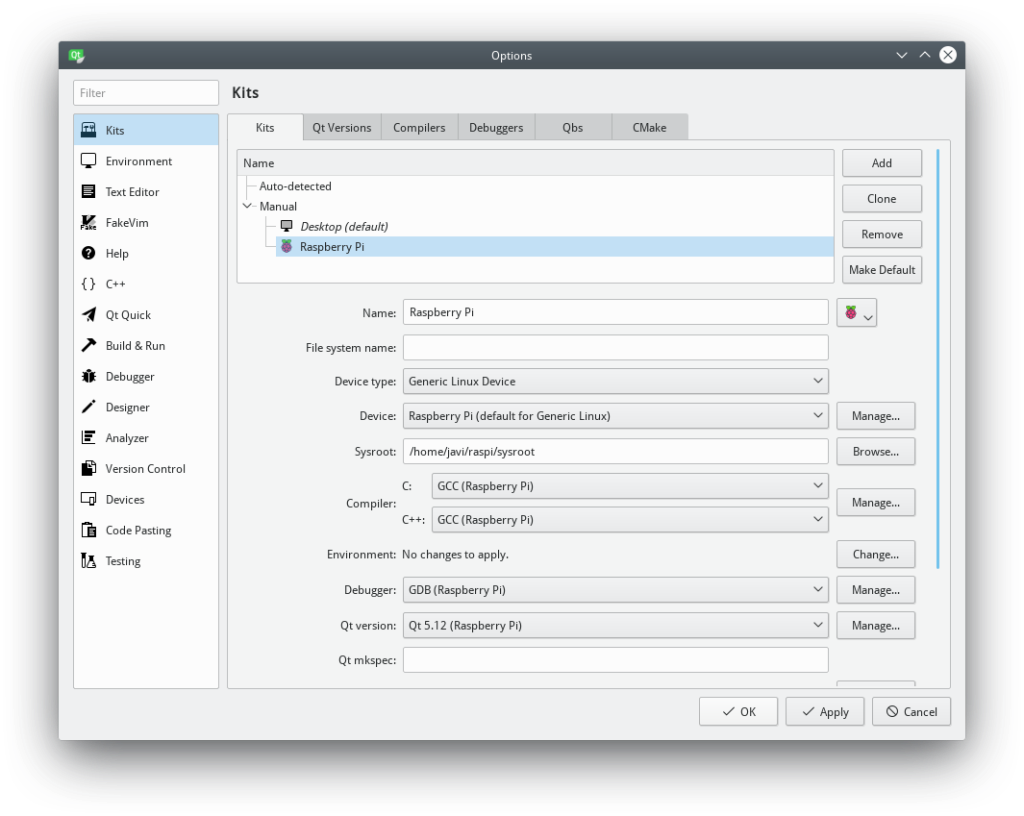
Finally, go to the Kits tab, Add a new kit, set the name and icon you prefer, and pay attention to the following configuration:
- Device type: Generic Linux Device
- Device: Raspberry Pi (defaut for Generic Linux)
- Sysroot: ~/raspi/sysroot
- Compiler C: GCC (Raspberry Pi)
- Compiler C++: GCC (Raspberry Pi)
- Debugger: GDB (Raspberry Pi)
- Qt version: Qt 5.12 (Raspberry Pi)
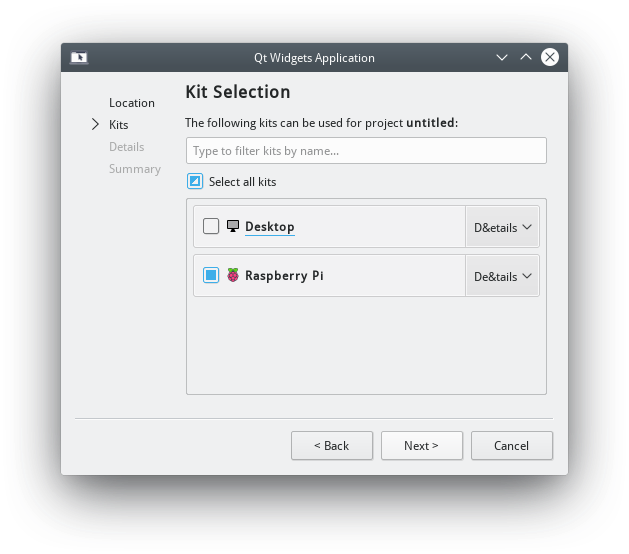
All the configuration is already done. You can test your configuration by creating anew project and selecting the previously defined kit configuration: Raspberry Pi.
That should do it. You can now design, build and deploy your Qt Raspberry Pi apps in you computer and, execute and debug them directly in your Raspberry Pi.
Setting up SSH Keys for Qt in Qt 5.14.1+
In Qt 5.14.1 when setting up devices (Raspberry Pi) in Qt creator you have to use a SSH key now. The password option is not there anymore. Have Qt generate the SSH key and copy that to your raspberry pi via SCP or what ever. The “qtc_id.pub” file goes into /home/pi/.ssh then create a file called “authorized_keys” in the .ssh folder.
touch ~/.ssh/authorized_keysnext
cat "qtc_id.pub" >> authorized_keysThis is just to copy the name qtc_id.pub into that file as plain text. save the file and exit. Then
chmod 700 ~/.ssh
chmod 600 ~/.ssh/authorized_keys
You should now be able to connect to the Raspberry Pi when setting it up in Qt creator as described in the tutorial above.
Conclusion
Qt can be somewhat intimidating when working with tool chains and devices. You should now have a working setup that will enable you to cross-compile Qt applications and debug them directly on the Raspberry Pi using your PC as the development environment .
